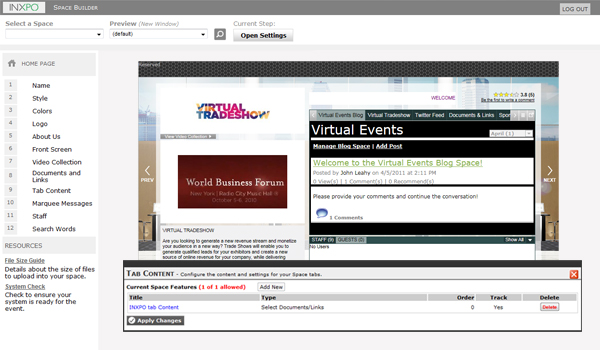
This step allows you to setup and configure the bulk of your sponsor space content, which is displayed in a tab format within your space.
You can link your tab to the documents and links that you uploaded in the Documents/Links step, redirect a tab to an external web page, or create a custom HTML page to be displayed when the user clicks on the tab. The maximum number of content tabs varies depending upon your event. Consult your event host or your primary event contact for more information. The default setting when adding a new content tab is External Web Page.
Note: Each event has a unique set of content options. All of the tab content types listed below may not be available for your event. Please check with your event host or your primary event contact to see which features are available in your event.
To create a new tab:
- Click "Add New"
- Follow the steps below, based upon what action you want to occur when the user clicks the tab.
Used to configure tab content by displaying a list of documents and links uploaded in the Documents and Links step.
Note: It is not recommended that you have both a Web Folders feature and a Select Documents/Links feature because the different user interface can cuase confusion on the part of the attendee.
- Enter the tab name in the "Title" field. This title will appear on the tab that is created.
- Enter a number in the "Display Order" field. This number determines how your tabs will be sorted; lower number tabs appear at the top.
- In the “Content Type” drop-down menu, choose “Select Documents and Links” or “Documents and Links.” If you want to display all of the documents and links on one tab, select the “Documents And Links” content type. If you want to split the records between multiple tabs, choose the “Select Documents and Links” content type.
- Activate the “Track Visits” checkbox to enable this reporting feature. The system will keep track of how many users click on the tab, and this information will be available in your sponsor space activity report.
- Place a checkmark next to the documents and links that you would like to display when the user clicks this tab.
Note: If you have not yet added the documents and/or links in the Documents and Links step, you should do so at this time. - Click “Save Changes”

Used to link your tab to an external URL.
- Enter the tab name in the "Title" field. This title will appear on the tab that is created.
- Enter a number in the "Display Order" field. This number determines how your tabs will be sorted: lower number tabs appear at the top.
- In the "Content Type" drop down menu, choose "External Web Page".
- Activate the "Track Visits" checkbox to enable this reporting feature. The system will keep track of how many users click on the tab and this information will be available in your sponsor space activity report.
- In the URL section, paste or type in the full path of the page that you wish to link to, beginning with "http://".
- Click “Save Changes”.
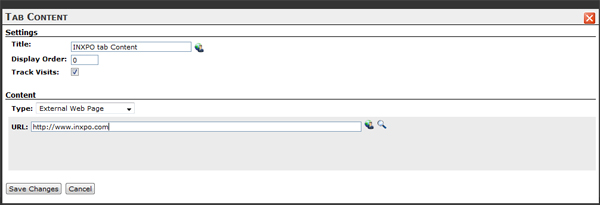
Note: External Web Page URLs can be previewed by clicking on the maginifying glass icon next to the
URL field.
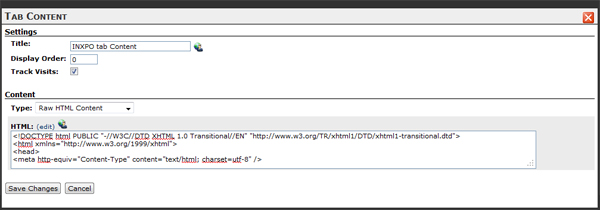
Used to display a custom HTML page.
- Enter the tab name in the "Title" field. This title will appear on the tab that is created.
- Enter a number in the "Display Order" field. This number determines how your tabs will be sorted: lower number tabs appear at the top.
- In the "Content Type" area drop down menu, choose “Raw HTML Content”.
- Activate the “Track Visits” checkbox to enable this reporting feature. The system will keep track of how many users click on the tab and this information will be available in your sponsor space activity report.
- In the HTML section, paste or type in the HTML code that you want your tab to display.
- Click “Save Changes”.
The following are additional Optional Features that may be available at this step.
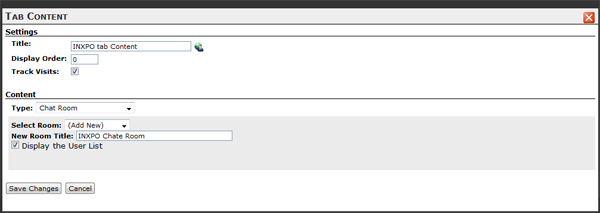
Used to link your tab to a private chat room.
Note: If your sponsor space layout has a chat room enabled, there will be an additional tab that expands to display the chat room. A chat room added in the Tab Content step will list the chat room title in the “Content” tab. These two chat room display areas can be set up to link to different chat rooms or the same chat room.
- Enter the tab name in the "Title" field. The title will appear on the tab that is created.
- Enter a number in the “Display Order” field. This number determines how your tabs will be sorted: lower number tabs appear at the top.
- In the "Content Type" area drop down menu, choose “Chat Room”.
- Activate the “Track Visits” checkbox to enable this reporting feature. The system will keep track of how many users click on the tab and this information will be available in your sponsor space activity report.
- In the “Select Room” drop-down menu, choose the chat room that you would like your tab to link to or select “Add New” to create a chat room. You can create multiple chat rooms using the “Add New” button.
- Click “Save Changes”. The created chat rooms will automatically be assigned to the tab content when you save.
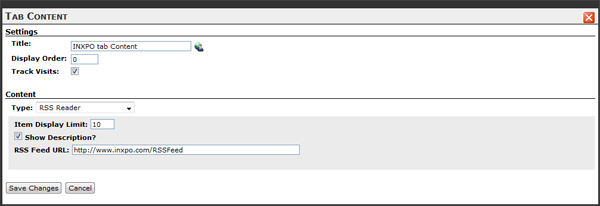
Used to display an RSS feed.
- Enter the tab name in the "Title" field. This title will appear on the tab that is created.
- Enter a number in the "Display Order" field. This number determines how your tabs will be sorted: lower number tabs appear at the top.
- Activate the "Track Visits" checkbox to enable this reporting feature. The system will keep track of how many users click on the tab and this information will be available in your sponsor space activity report.
- In the "Content Type" area drop down menu, choose "RSS Reader".
- In the "Item Display Limit" section, enter the number of items that you want to display from your RSS feed.
- Select "Show Description" if you want to display the description text for each RSS feed item.
- In the "RSS Feed URL" section, enter the URL to your RSS Feed.
- Click "Save Changes".
Used to display various Social Media Features.
- Enter the tab name in the "Title" field. This title will appear on the tab that is created.
- Enter a number in the "Display Order" field. This number determines how your tabs will be sorted: lower number tabs appear at the top.
- Activate the "Track Visits" checkbox to enable this reporting feature. The system will keep track of how many users click on the tab and this information will be available in your sponsor space activity report.
- In the "Content Type" area drop down menu, choose "Social Media".
Social Media Configuration:
Enable Twitter
- The Twitter Feature provides the ability to pull Tweets with a selected hashtag into the environment. Via Twitter, users can also Tweet from the event.
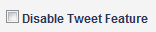
- The Disable Tweet Feature will remove icons which allow a user to Tweet from within the event. The icons display in the default profile edit space and the chat status menu that appears in the lower-right corner of the event window. This feature will not remove the "Send Tweet" button from the attendee or sponsor user profile display.
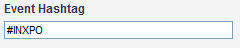
- The Event Hashtag is an identifier used to classify Tweets and create a feed of Tweets from Twitter. The Hashtag is preceded by "#" (i.e. #INXPO or #INXPOLIVE). The Event Hashtag implemented in this area will automatically append to all tweets posted from within the environment. The Hastag has a limit of 140 characters.
- Enable Twitter is a checkbox that will implement the Twitter Feature in the Social Suite. Once Twitter is enabled, the Twitter configuration options will appear which provide administrators additional selections to control the behavior and appearance of the Twitter widget.
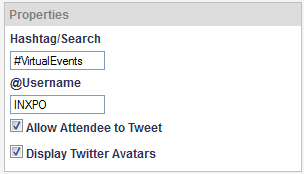
- Properties is a Twitter Menu that contains the Twitter abilities within the event environment.
- Hashtag/Search is an identifier used to classify Tweets and create a feed of Tweets from Twitter. The Hashtag is preceded by "#" (i.e. #INXPO). The Event Hashtag implemented in this area will pull all Tweets from Twitter with the specific Hashtag appended if the "Search by Hashtag" radio button is selected. The Hastag has a limit of 140 characters.
- "Allow Attendee to Tweet" will enable the Tweet Button within the Social Suite that provides the ability for users to Tweet directly from the Twitter Widget.
- "Display Twitter Avatars" will display the avatars of Twitter users from their Twitter pages. The Twitter Avatars will display next to each Tweet in the Twitter Widget.
- "@UserName" will insert the Host User Name in the attendee tweet, next to the Hashtag. If no @UserName is inserted, then the default of INXPO will appear.
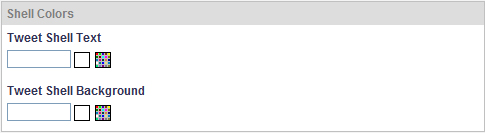
- Shell Colors is a Twitter Menu that provides the text and background color options for the Twitter Widget. Type the HEX Code of the colors within the Text Box (i.e. #000000) or optionally select the Color Picker.
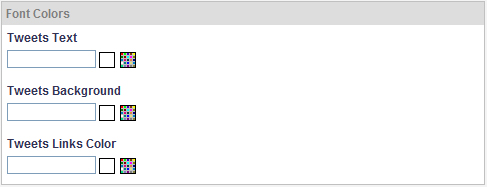
- Font Colors is a Twitter menu that provides the font color options for the Twitter Widget. Type the HEX Code of the colors within the Text Box (i.e. #000000) or optionally select the Color Picker.

Enable Facebook
- The Facebook Feature provides the ability to allow attendee and sponsor users to post to their Facebook Wall directly from the Social Suite area of the virtual environment. The Facebook Feature will create a feed of the posts posted from within the environment.
- Enable Facebook is a checkbox that will implement the Facebook Feature in the Social Suite.
- The Facebook Feature provides the ability to allow attendee and sponsor users to post to the Facebook Page specified directly from the Social Suite area of the virtual environment. The Facebook Feature will display a feed of the posts posted from within and outside of the environment. A "Like" button will also display to allow the participants to like the page and comment on the page and posts shown.
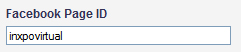
- The Facebook Page ID is the title of the page or ID, shown in the Facebook URL. This page is typically created by the event or super administrator or their company. The Facebook Page streams Facebook Posts made on the page within the Social Suite. The Page ID is an identifier that allows the Facebook posts and comments to be streamed within the Social Suite.

Enable LinkedIn
- The LinkedIn Feature provides the ability to allow attendee and sponsor users to view their LinkedIn Contacts directly from the Social Suite area of the event. The LinkedIn Feature shows those contacts that are currently logged-in to the event environment. Once enabled, no other action is required by an administrator.

Enable INXPO Chat
- The INXPO Chat Feature provides the ability to allow attendee and sponsor users to Chat directly from the Social Suite area of the virtual environment. The INXPO Chat Feature can be linked to an existing chat area or a new chat room can be created.
- From the Group Chat Drop Down Menu, if an existing chat room has not been created, select "(create a group chat)". The Edit Group Chat Menu will appear.
- The Title of the Chat Room will appear to event attendee and sponsor users. The Title will be displayed in the event environment at the top of the Group Chat area in the following format: "[User Name], you have joined [Chat Title]." Optionally insert a language alternative for an event with multiple languages enabled.
- Active should be checked for any chat room used within the Social Suite. If Active is unchecked, users will receive an error although the Chat Feature is enabled.
- Maximum Users Allowed is an option to limit the user capacity of a chat room. "0" will default, placing no capacity on the amount of users that can access the chat room. Insert a numeric value to place a cap on the number of users allowed.
- The Authorized User List determines which users will have moderator rights to the group chat. Moderators have the ability to remove off-topic or offensive remarks by deleting lines of chat. Once the chat lines are deleted by a moderator within the event environment, they still remain in the transcripts. Select the User Finder to locate an existing user that will moderate; or if no moderators will be used, skip this step.
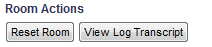
- Room Actions are tools within the Chat Room Editor. The Room Action Buttons will appear after Submit of a new chat room.


Connection Wall
- The Connection Wall Feature allows users to view their connections' event activity directly from the Social Suite area of the event. Attendee and Sponsor Users can view such items as when a connection logged in, what presentations he attended, documents he accessed and spaces he visited. A user can click any of his connections' activities to be taken directly to the event area. Once enabled, no other action is required by an administrator.

Navigation Bar Position and Color
- The Navigation Bar Position and Color is a menu that provides administrators an opportunity to alter the display of the widget buttons and background within the Social Suite. The Bar Position and Bar color do not change the display of the Social Suite Tab within the Host Space.
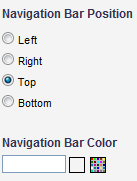
Insert a Navigation Bar Color by typing the HEX Code of the color within the Text Box (i.e. #000000) or optionally select the Color Picker.
Used to link your tab to a private blog space.
Note: A blog space will only display on the “Content” tab unless the sponsor has a custom sponsor space layout that is designed to display the blog space similar to a chat room with its own tab.
- Enter the tab name in the “Title” field. The title will appear on the tab that is created.
- Enter a number in the “Display Order” field. This number determines how your tabs will be sorted: lower number tabs appear at the top.
- In the "Content Type" area drop down menu, choose “Blog Space”.
- Activate the “Track Visits” checkbox to enable this reporting feature. The system will keep track of how many users click on the tab and this information will be available in your sponsor space activity report.
- In the "Select Blog Space" drop down menu, choose the blog space that you would like your tab to link to or select “Add New” to create a blog space. You can create multiple private blog spaces using the “Add New” button.
- Click “Save Changes”. The created blog spaces will automatically be assigned to the tab content when you save.
Once you have finished setting up and configuring your Tab Content, click “Apply Changes”.
Note: You can go back and edit any step at any time during the sponsor space building process.