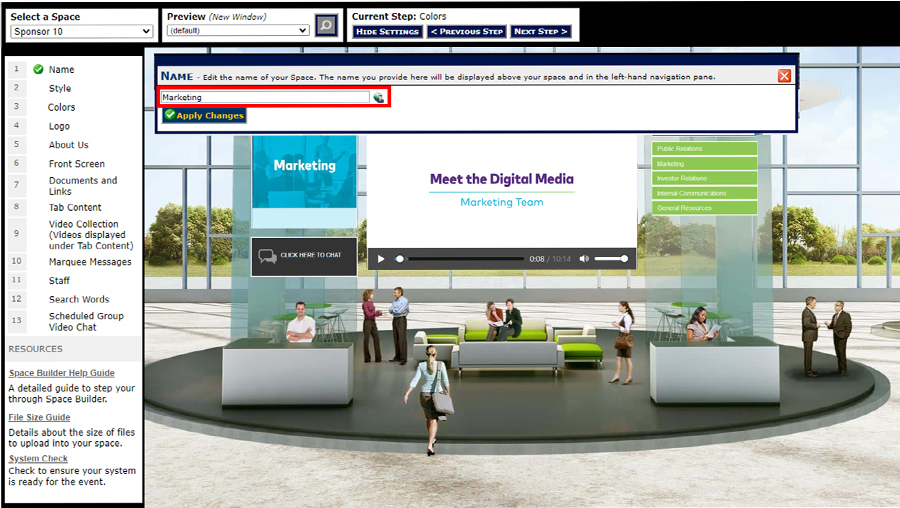
Space Builder Guide: Steps
This step allows you to choose the visual appearance of your sponsor space. Space styles are chosen for aesthetic value and to match your corporate image. Each style offers identical functionality.
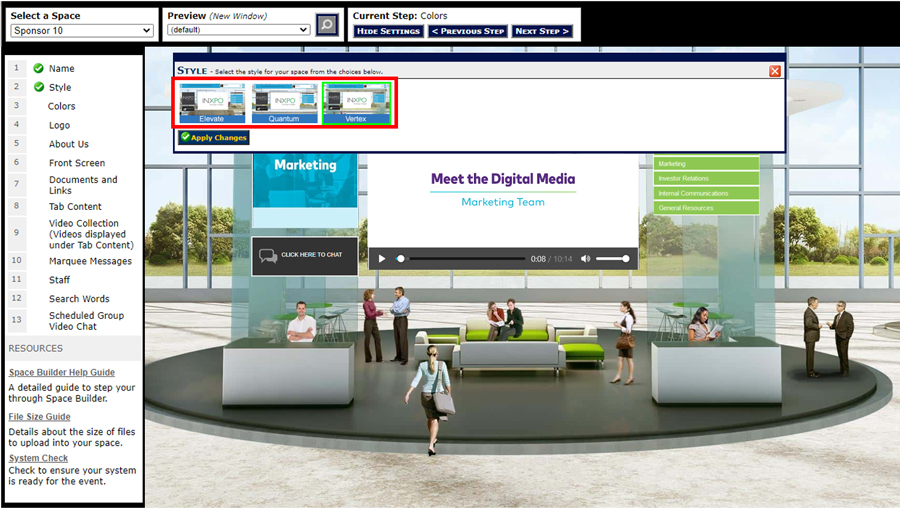
To see a large preview of any sponsor space style, select the sponsor space style thumbnail you want to preview and then click “Apply Changes” or double-click on the selected thumbnail. This will display the selected sponsor space style in the main work area.
Once you have chosen a space buidler style for your space, click “Apply Changes”.
Note: You can go back and edit any step at any time during the space building process.
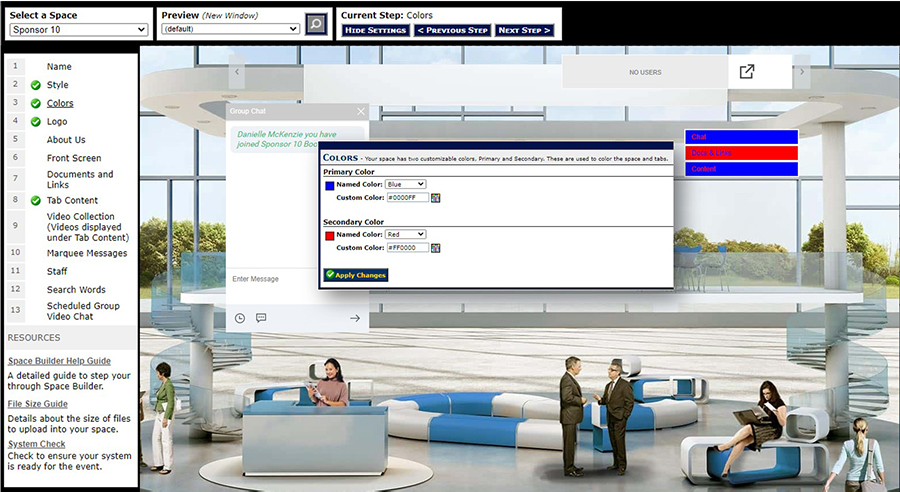
To choose your space colors, you can do one of the following:
- Select your colors from the drop-down menu of the most popular color choices.
- Click the “Define Custom Color” button and pick a color from the Color Selection grid (see image below). Once you have chosen the color that you want to use, click “Save” in the lower right hand corner of the Color Selection window to save your selection.
- Enter a specific shade of color by entering the six-digit HEX value (i.e. # CCCCCC).
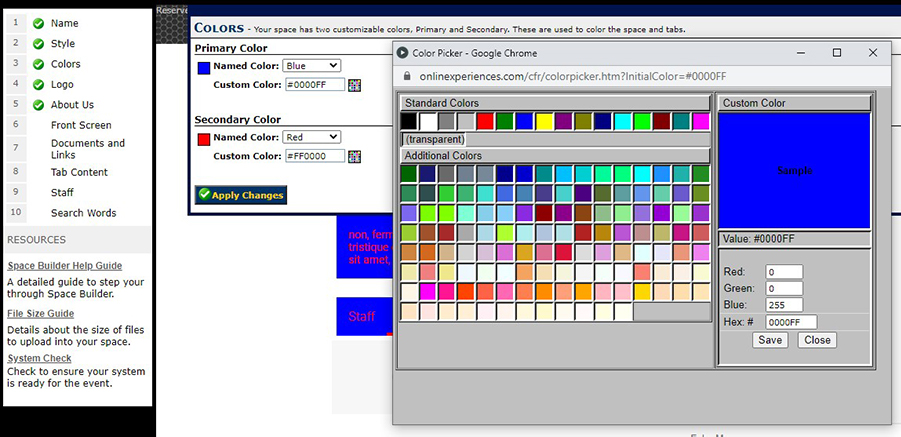
Once you have made your selection, it will display in the main work area.
Once you have selected your space colors, click “Apply Changes”.
3D Layout Example
Primary Color:
- The unselected tab color
- The selected tab font color
- The selected tab color
- The unselected tab font color
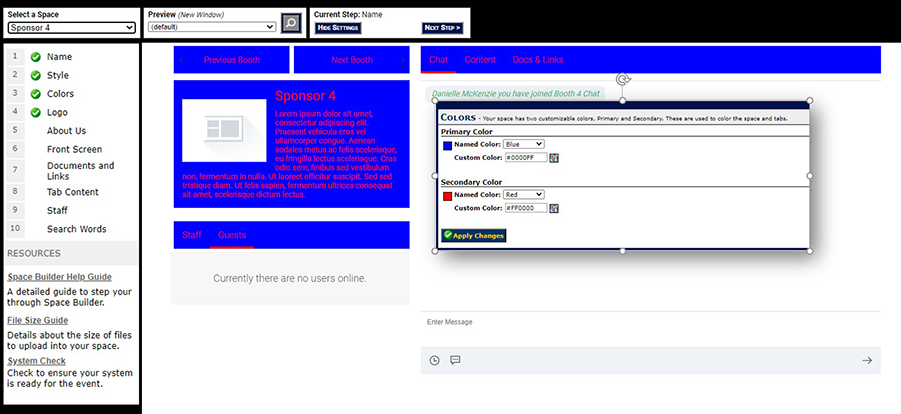
Responsive Layout Example
Primary Color:
- The tab color
- The "Previous" and "Next" button background color
- The background color of the About Us area
- The tab font color
- The "Previous" and "Next" button font color
- The "About Us" font color
Note: You can go back and edit any step at any time during the space building process. If you change the sponsor space style at a later date/time, these color selections will remain and be applied accordingly to the new space style that you use.
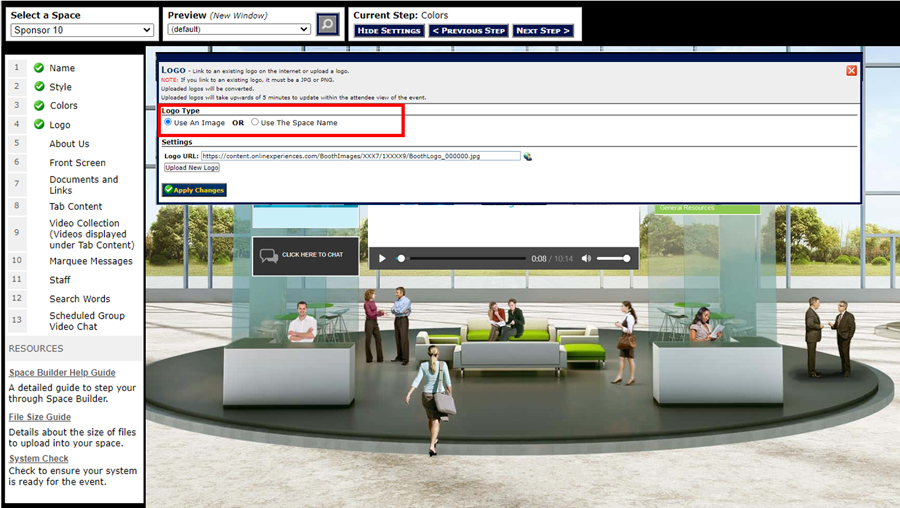
This step allows you to upload your sponsor space logo, which is typically your company logo. You may either link to a file hosted on a remote server (i.e. your corporate website) or upload the logo directly from your local drive. Please refer to the Format & Requirements guide for the accepted file formats and other technical specifications.
To upload a file from your local drive -
- Click “Upload New Logo”
- Click “Browse”
- Locate your logo on your hard drive or file server.
- Click “Start Upload”
If you do not have a logo that you wish to upload, you can just enter your sponsor space name as plain text. Simply check the box next to “Use My Space Name” and define the font, color and size of your text. Then click “Apply Changes.” Your sponsor space name text will appear in the work area.
Once you are satisfied with your sponsor space logo, click “Apply Changes”.
Notes: You can go back and edit any step at any time during the sponsor space building process.
Uploaded logos will take upwards of 5 minutes to update within the attendee view of the event.
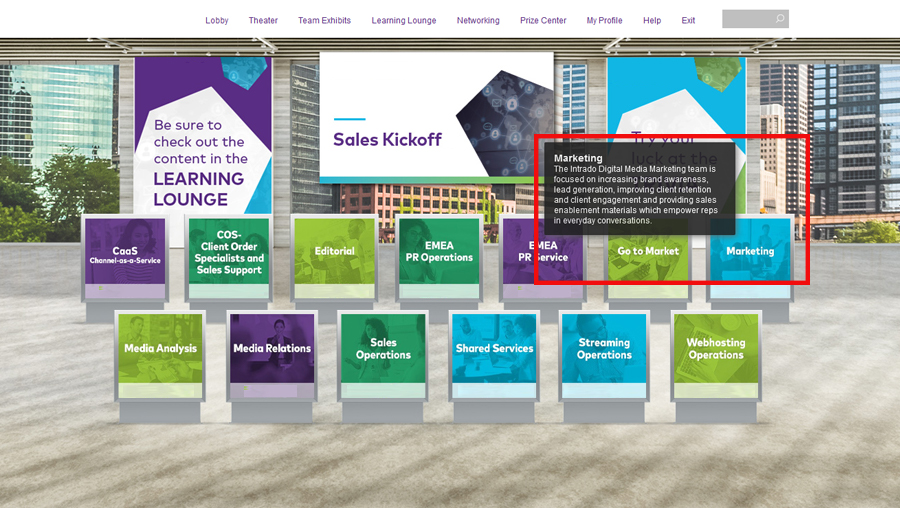
This step allows you to add a brief message that will pop-up when the users mouse over your sponsor space in the sponsor directory, the exhibit hall and will display on your sponsor space. The recommended character count for the About Us message is 250 characters or less.
To add the About Us message, simply type in the text you want to display.
Note: The "About Us" message does not support the characters ", %, or &
Once you are satisfied with the About Us message, click “Apply Changes” .
Note: You can go back and edit any step at any time during the space building process.
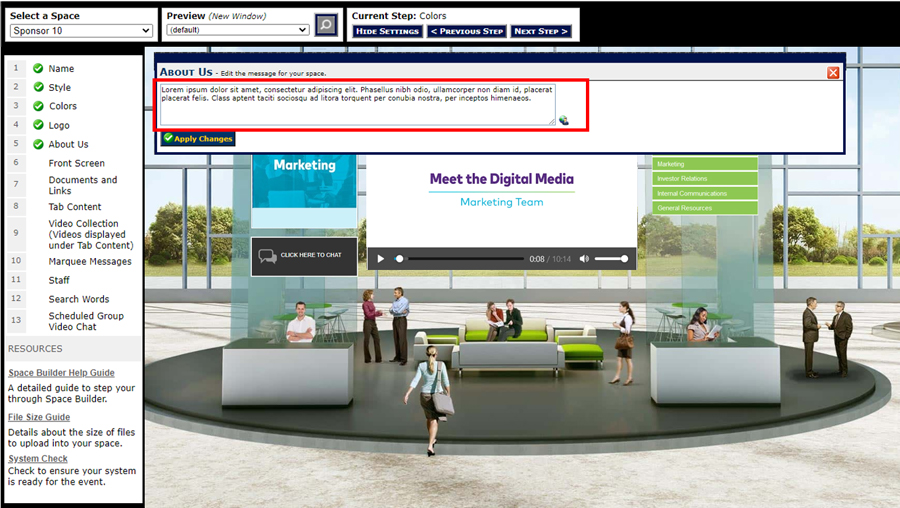
The message will appear over your sponsor space in the exhibit hall and sponsor directory, as shown below:
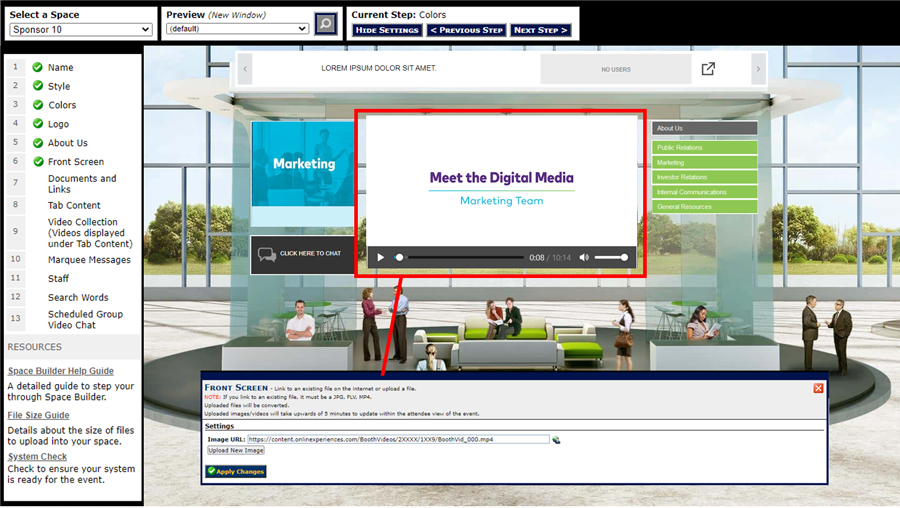
This step allows you to add an image or short video clip to your sponsor space. The front screen is one of the first things that an attendee’s eye is drawn to before they begin exploring the rest of your space. Thus, we encourage you to make this feature as exciting as possible. Please refer to the Format & Requirements guide for the accepted file formats and other technical specifications.
To upload a file from your local drive -
- Click “Upload New Image.”
- Click “Browse.”
- Locate the file you wish to upload on your hard drive or server.
- Click “Start Upload.”
When the upload is complete your file will appear in the work area. Uploaded images/videos will take upwards of 5 minutes to update within the attendee view of the event.
When you have finished uploading your front screen, click “Apply Changes”.
Note: You can go back and edit any step at any time during the space building process.
Uploaded images/videos will take upwards of 5 minutes to update within the attendee view of the event.
This step allows you to add a short scrolling message in your sponsor space as well as modify its appearance. The marquee message is typically used to add a welcome message, highlight a special product/deal/promotion, or make an important announcement.
The recommended character count for the marquee message is 100 characters or less. The message cannot contain the following characters: & (ampersand), ‘(apostrophe), or “ (quotation marks).
Note: Since only 1 marquee message can be added per sponsor space, two shorter messages (with less then 50 characters each) can be added with spaces in between to work as two messages.
To add a marquee message, type in the text you want to display in the "Marquee Text" field. By selecting "Delete" you will remove the text that you have entered.
Note: This will not remove the language alternatives that you have entered for the marquee message. To remove the language alternatives you must select the icon and delete the text for each language alternative.
To choose the font color and the background color:
- Select a color from the drop-down menu or enter a specific shade of color by entering the six-digit HEX value (i.e. # 40E7D5).
- Once you have selected a new color, click “Apply Changes” to preview your selection in the work area.
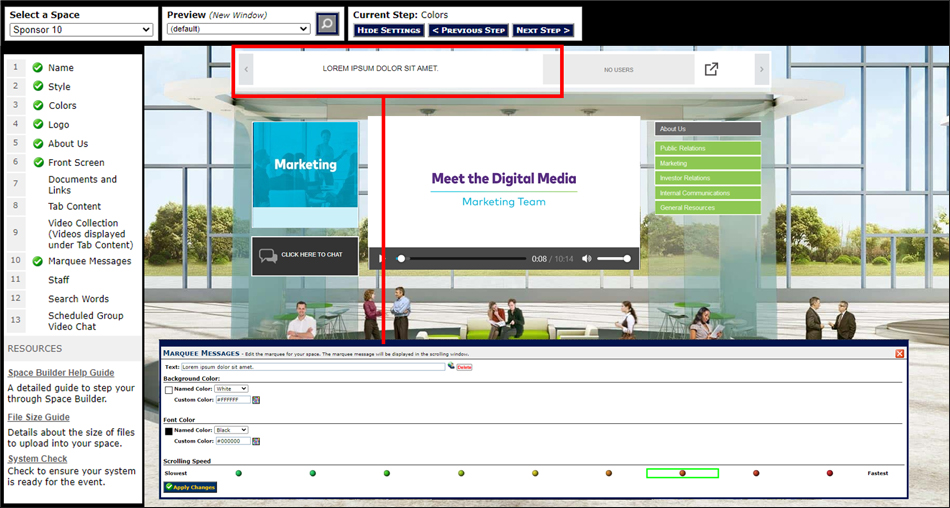
You can adjust the scrolling speed by clicking on one of the colored dots in the “Scrolling Speed” area. The green buttons on the left are for slower speeds, beginning with “Non-Scrolling”. Click “Apply Changes” to view the marquee at the new scrolling speed.
Once you are satisfied with your marquee message, click “Apply Changes”.
Note: You can go back and edit any step at any time during the space building process.
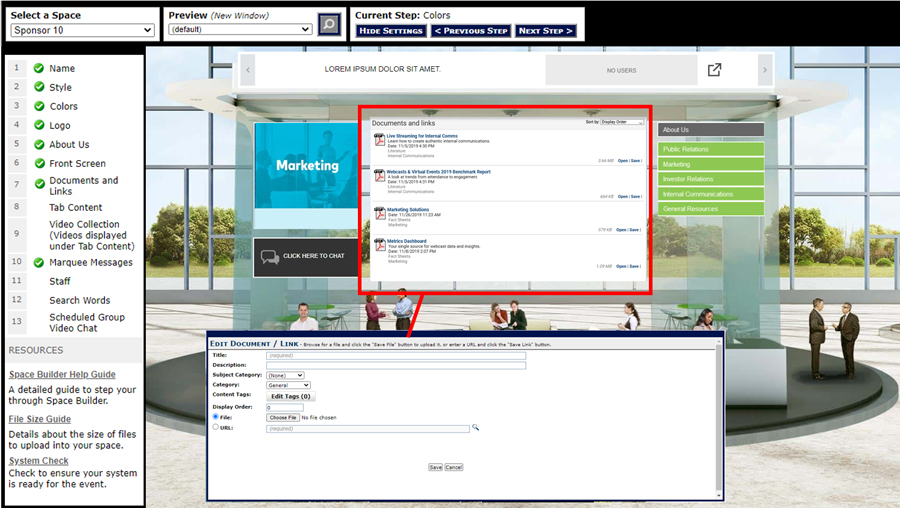
This step allows you to upload the files and links (for example, your corporate website, brochures, product details, and white papers) that you want to be available in your sponsor space.
To add your document or link:
- Click “Add New Document/Link.”
- If you would like to upload a file from your hard drive, click on the “Upload a File” tab. If you would like to link to an external URL, click on the “Enter a URL” tab.
- Enter the title of the file or link in the “Title” field. If you would like to use an exceptionally long title or include additional information, enter the additional text in the “Description” field. This title will be displayed in the list of documents and links in your sponsor space.
- Specify the “Subject Category” of the file or link, if desired. Note: Selecting a Subject Category allows you to display the document/link in your sponsor space as well as in the event’s Media Center (if available). If you would prefer not to display your documents/links in the event Media Center, choose “none.”
- Choose the file/link "Category." The category will be displayed in the list of documents and links in your sponsor space.
- Enter a display order number for the document/link. Note: The display order entered here affects the display in the content tab and in “My Briefcase.” It does not affect the display order in the Media Center.
- If uploading a file, click “Browse” to locate a file on your local drive. If you are creating a link, type the URL of the file that you wish to link to.
- Click “Save File” or “Save Link.”
- The document/link will appear in the main Documents and Links window.
Documents and links can be edited by clicking on the by clicking on the record that you want to edit on the list page. Edit the content and then click “Save.”
In order to make your documents accessible from within your sponsor space, you will need to set up one of your content tabs as a “Select Documents and Links” tab. See Tab Content for instructions on creating content tabs.
Once you are satisfied with the list of your documents and links, click “Apply Changes”.
Note: You can go back and edit any step at any time during the space building process.
This step allows you to setup and configure the bulk of your sponsor space content, which is displayed in a tab format within your space.
You can link your tab to the documents and links that you uploaded in the Documents/Links step, redirect a tab to an external web page, or create a custom HTML page to be displayed when the user clicks on the tab. The maximum number of content tabs varies depending upon your event. Consult your event host or your primary event contact for more information. The default setting when adding a new content tab is External Web Page.
Note: Each event has a unique set of content options. All of the tab content types listed below may not be available for your event. Please check with your event host or your primary event contact to see which features are available in your event.
To create a new tab:
- Click "Add New"
- Follow the steps below, based upon what action you want to occur when the user clicks the tab.
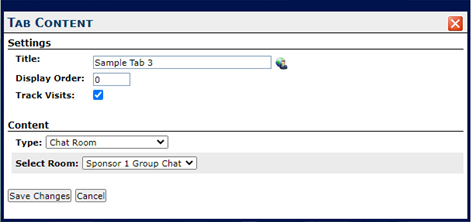
Use to link your tab to a text-based group chat room in your booth.
Note: If your sponsor space layout has a chat room enabled, there will be an additional tab that expands to display the chat room. A chat room added in the Tab Content step will list the chat room title in the “Content” tab. These two chat room display areas can be set up to link to different chat rooms or the same chat room.
- Enter the tab name in the "Title" field. The title will appear on the tab that is created.
- Enter a number in the “Display Order” field. This number determines how your tabs will be sorted: lower number tabs appear at the top.
- In the "Content Type" area drop down menu, choose “Chat Room”.
- Activate the “Track Visits” checkbox to enable this reporting feature. The system will keep track of how many users click on the tab and this information will be available in your sponsor space activity report.
- In the “Select Room” drop-down menu, choose the chat room that you would like your tab to link to or select “Add New” to create a chat room. You can create multiple chat rooms using the “Add New” button.
- Click “Save Changes”. The created chat rooms will automatically be assigned to the tab content when you save.
- Enter the tab name in the "Title" field. This title will appear on the tab that is created.
- Enter a number in the "Display Order" field. This number determines how your tabs will be sorted: lower number tabs appear at the top.
- In the "Content Type" drop down menu, choose "External Web Page".
- Activate the "Track Visits" checkbox to enable this reporting feature. The system will keep track of how many users click on the tab and this information will be available in your sponsor space activity report.
- In the URL section, paste or type in the full path of the page that you wish to link to, beginning with "https://". Make sure you are linking to a secure webpage.
- Check Launch in new window if the external webpage cannot be contained within an iframe and is displaying an error when clicked.
- Provide text in the Enter Message Here area when launching the external webpage in a new window.This message will display at the tab content frame. The message should inform attendees that the external webpage has been opened in a new window.
- Click “Save Changes”.
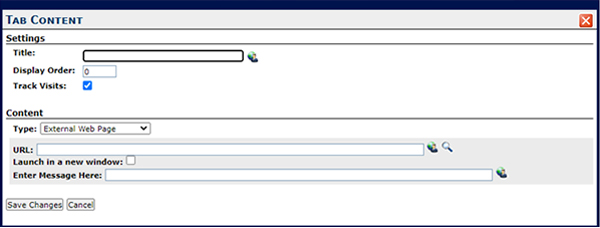
Note: External Web Page URLs can be previewed by clicking on the maginifying glass icon next to the URL field.
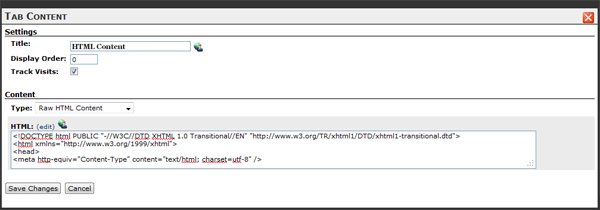
- Enter the tab name in the "Title" field. This title will appear on the tab that is created.
- Enter a number in the "Display Order" field. This number determines how your tabs will be sorted: lower number tabs appear at the top.
- In the "Content Type" area drop down menu, choose “HTML Content”.
- Activate the “Track Visits” checkbox to enable this reporting feature. The system will keep track of how many users click on the tab and this information will be available in your sponsor space activity report.
- In the HTML section, paste or type in the HTML code that you want your tab to display.
- Click “Save Changes”.
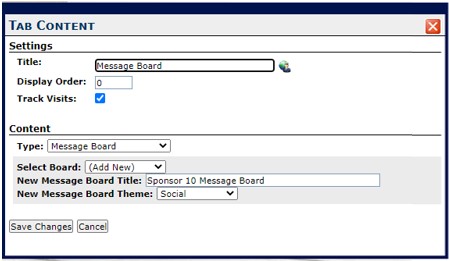
- Enter the tab name in the "Title" field. This title will appear on the tab that is created.
- Enter a number in the "Display Order" field. This number determines how your tabs will be sorted: lower number tabs appear at the top.
- Activate the “Track Visits” checkbox to enable this reporting feature. The system will keep track of how many users click on the tab and this information will be available in your sponsor space activity report.
- In the "Type" drop down menu, choose “Message Board”.
- In the "Select Board" drop down menu, choose from previously created message boards or select “Add New” to create a new message board.
- Enter a title for your message board and select the "Social" theme.
- Click “Save Changes”.
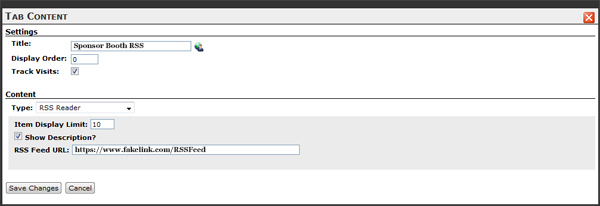
- Enter the tab name in the "Title" field. This title will appear on the tab that is created.
- Enter a number in the "Display Order" field. This number determines how your tabs will be sorted: lower number tabs appear at the top.
- Activate the "Track Visits" checkbox to enable this reporting feature. The system will keep track of how many users click on the tab and this information will be available in your sponsor space activity report.
- In the "Content Type" area drop down menu, choose "RSS Reader".
- In the "Item Display Limit" section, enter the number of items that you want to display from your RSS feed.
- Select "Show Description" if you want to display the description text for each RSS feed item.
- In the "RSS Feed URL" section, enter the URL to your RSS Feed.
- Click "Save Changes".
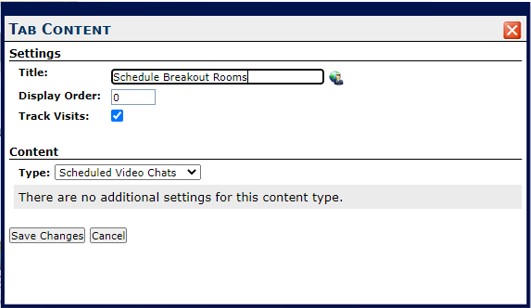
- Enter the tab name in the "Title" field. This title will appear on the tab that is created.
- Enter a number in the "Display Order" field. This number determines how your tabs will be sorted: lower number tabs appear at the top.
- Activate the "Track Visits" checkbox to enable this reporting feature. The system will keep track of how many users click on the tab and this information will be available in your sponsor space activity report.
- In the "Type" area drop down menu, choose "Scheduled Video Chats".
- Click "Save Changes".
Used to configure tab content by displaying a list of documents and links uploaded in the Documents and Links step.
- Enter the tab name in the "Title" field. This title will appear on the tab that is created.
- Enter a number in the "Display Order" field. This number determines how your tabs will be sorted; lower number tabs appear at the top.
- In the “Content Type” drop-down menu, choose “Select Documents and Links” or “Documents and Links.” If you want to display all of the documents and links on one tab, select the “Documents And Links” content type. If you want to split the records between multiple tabs, choose the “Select Documents and Links” content type.
- Activate the “Track Visits” checkbox to enable this reporting feature. The system will keep track of how many users click on the tab, and this information will be available in your sponsor space activity report.
- Place a checkmark next to the documents and links that you would like to display when the user clicks this tab. Note: If you have not yet added the documents and/or links in the Documents and Links step, you should do so at this time.
- Click “Save Changes”

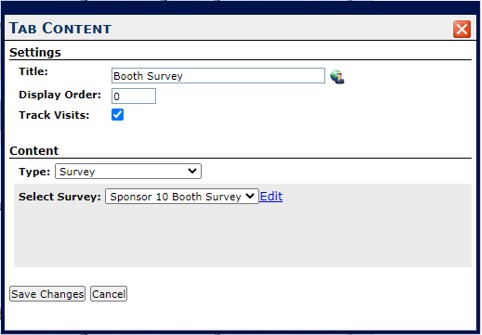
Use to configure a survey in a tab in your booth.
- Enter the tab name in the "Title" field. This title will appear on the tab that is created.
- Enter a number in the "Display Order" field. This number determines how your tabs will be sorted; lower number tabs appear at the top.
- Activate the “Track Visits” checkbox to enable this reporting feature. The system will keep track of how many users click on the tab, and this information will be available in your sponsor space activity report.
- In the "Type" drop down menu, choose “Survey”.
- In the "Select Survey" drop down menu, choose from previously created survey or select “Add New” to create a new one.
- When creating a new survey, fill out the page details on the pop-up "Edit Survey" page.
- Once you have filled in the information for the survey click "Submit".
- Click “Save Changes”
At any time you can go back and edit your survey by selecting the survey and clicking "Edit".
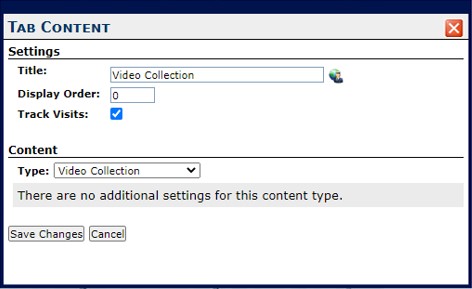
Use to the video collection in the tab content.
- Enter the tab name in the "Title" field. This title will appear on the tab that is created.
- Enter a number in the "Display Order" field. This number determines how your tabs will be sorted; lower number tabs appear at the top.
- Activate the “Track Visits” checkbox to enable this reporting feature. The system will keep track of how many users click on the tab, and this information will be available in your sponsor space activity report.
- In the “Type” drop-down menu, choose “Video Collection”.
- Click “Save Changes”
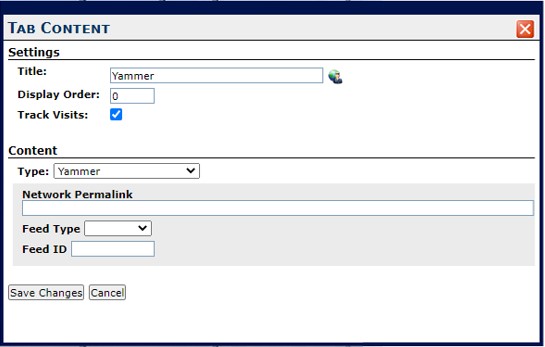
Use to configure a Yammer feed in your tab content.
- Enter the tab name in the "Title" field. This title will appear on the tab that is created.
- Enter a number in the "Display Order" field. This number determines how your tabs will be sorted; lower number tabs appear at the top.
- Activate the “Track Visits” checkbox to enable this reporting feature. The system will keep track of how many users click on the tab, and this information will be available in your sponsor space activity report.
- In the “Type” drop-down menu, choose “Yammer”.
- Enter the “Network Permalink”for the Yammer Feed
- Select the “Feed Type” by choosing: “Default”, “Group”, “Topic” or “User”.
- Enter the “Feed ID”.
- Click “Save Changes”
This step allows you to add your sponsor space representatives and register them for the event by configuring their login and password information.
Note: The information you provide in this step will be used as the event login information. However, each sponsor space staff member will be able to set up and modify their own profiles, including login and contact information, once they log into the event.
To add a staff member that already has a profile (typically only the sponsor space administrator):
- Click “Add New Staffer”.
- Select the user’s name from the “Select User” drop down menu.
- Click “Save Changes”.
- Click “Add New Staffer”.
- Click “Create New User”.
- Fill out the following fields –
In the “Personal Info” tab (required):
- Name: Enter the full name of your new sponsor space staff member.
- Type: If applicable, select the type of user from the drop down menu. Typical options include “Staff” and “Administrator”. Access to administrative features may be limited based upon the user type.
- Email Address: Provide a valid email address (unique to each member).
- Login ID: Provide the login name the user will use to access the event.
- Password: Create a password for the user.
- Time Zone: Select the time zone of that the user works in. All times displayed n the event are adjusted to reflect the user’s local time.
- All tabs are optional and may be filled out by the user when the log into the event. You may fill out the contact information if desired.
- Click “Save Changes”.
- The new staff member will appear in the main Space Staff window.

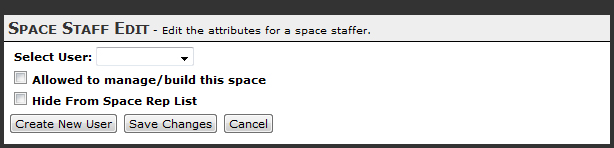
- The main Space Staff window displays a list of all of the staff members assigned to the sponsor space.
- Click on “Edit” link on the same row as the staffer’s name.
- Modify the user’s profile as needed. You may upload the user’s picture, if desired.
- Click “Save Changes”.
Once you have added your sponsor space staff members and configured their information, click “Apply Changes”.
Note: You can go back and edit any step at any time during the sponsor space building process.
This step allows you to add all relevant search terms that you think should be associated with your sponsor space, your content, and/or your staff. You can specify keywords that will help event attendees and fellow sponsors find your sponsor space when using the event’s search feature.
To add search words to your sponsor space, simply type in all relevant search terms separated by a comma (i.e. “affiliate, network, consulting”) in the main text area window. Consider using the same search terms you would use in your search engine optimization efforts.
During the event, if a user searches for a keyword that you supply in this step, your sponsor space will be displayed in the search results.
Once finished, click “Apply Changes”.
Note: You can go back and edit any step at any time during the sponsor space building process.

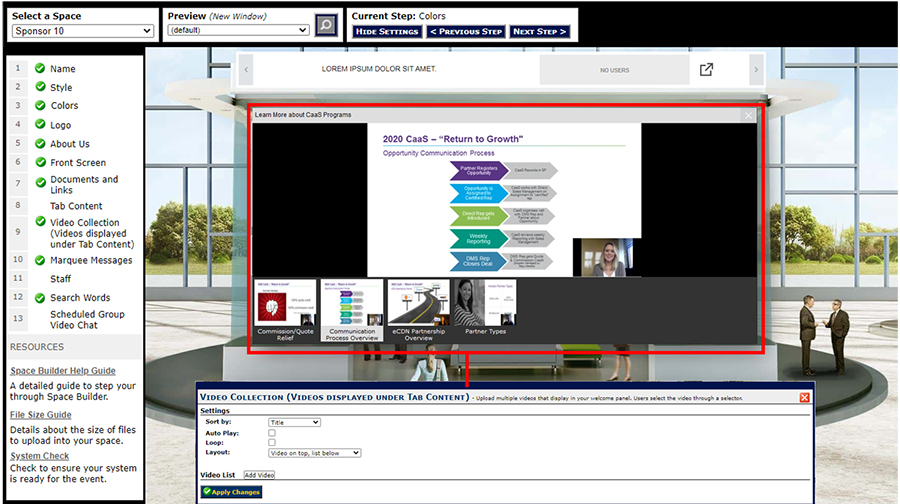
This step allows you to add one to many videos that will display in the video collection on your sponsor space. Users will be able to scroll through and select a video to view. The video collection is a great way to display product demos, case studies, and other company related information. Please refer to the Format & Requirements table for the accepted file formats and other technical specifications.
Settings
- Use the “Sort By” dropdown to select the order in which your videos will display.
- Select “Auto Play” if you want your videos to play automatically.
- Select “Loop” to have you videos start from the beginning once they have completed.
- Use the “Layout” dropdown to select the view in which your videos will display.
Add Video
- Enter the “Title” of your video.
- Enter the “Description” of your video. The description will display when a user hovers over the video thumbnail and/or title.
- The “Active” checkbox lets you determine whether you want this video to display in your space.
- Enter a number in the “Display Order” field. This number determines the order your videos will be displayed: lower number tabs appear at the top.
- Use the “Language” dropdown (if applicable) to select which language/locale you want to make this video available to.
- Select “Browse” to search for a video on your computer to upload.
- Enter a “Thumb URL” to have a thumbnail image display of your video. NOTE: If uploading a non-flv file a thumbnail will automatically be creating from the first frame of your video. Image dimensions are 120px X 90px.
When you have finished uploading your video, click “Save Changes” and you will be brought back to the Videos home page where you will need to click “Apply Changes”.
Note: You can go back and edit any step at any time during the space building process.
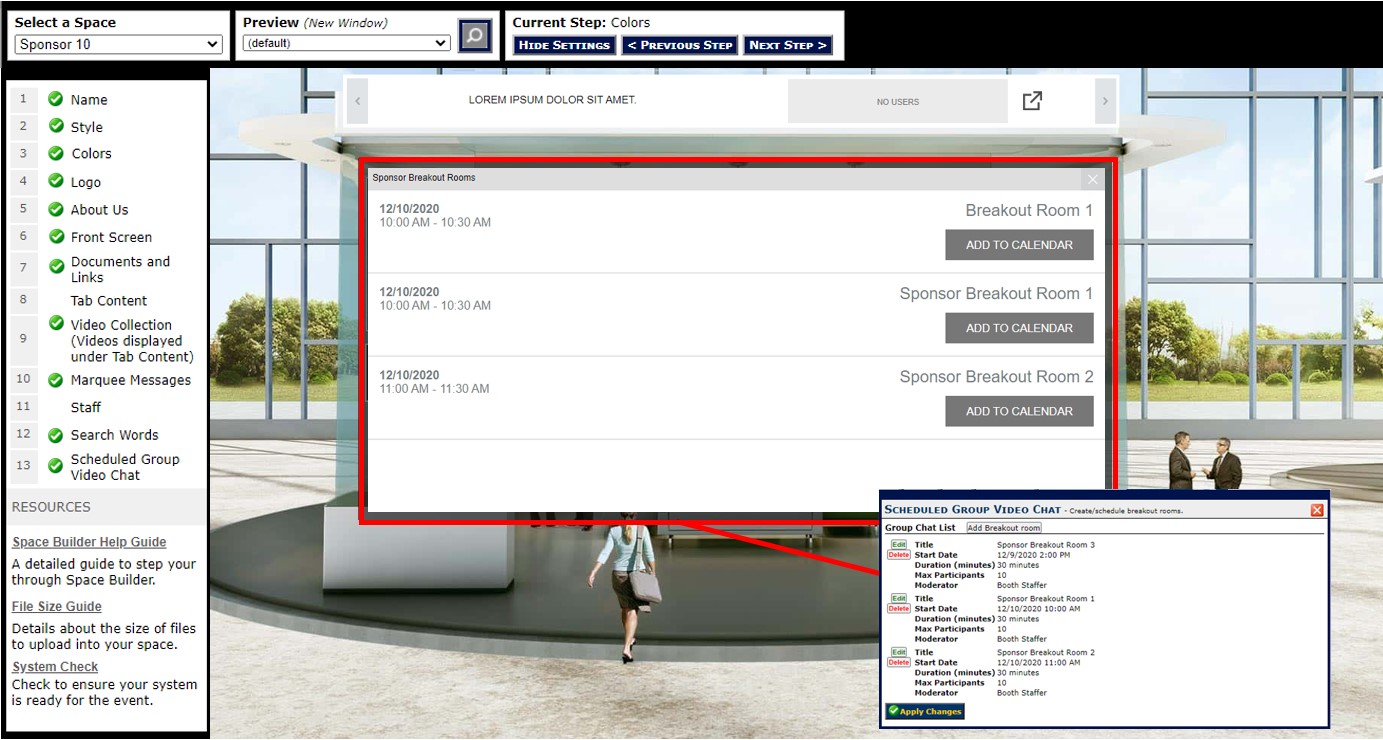
This step allows you create Scheduled Breakout Rooms (group video chats) in your sponsor space..
To create a new Group Video Chat:
- Click “Add Breakout Room”
- Fill out the following information –
- Title - Create a title for your breakout session.
- Start Date / Time - Enter the schedule start date and time of your session ( date and time entered in CST).
- Duration - Enter the planned duration of the session in minutes (max duration of 30 minutes).
- Max Participants - Enter the max number of participants you want to be able to join the session (max participant of 30 not including the moderator).
- Moderator - Select a moderator for the session from your list of staffers.
- Click"Save Changes".