Media Editor Glossary

The Media Editor is a simple-to-use interface for editing recorded webcasts. The media editor allows for a variety of tasks: adding or replacing slides, change slide timings, deleting or inserting content, and merging multiple recordings. This glossary will outline the various functions including how they can be applied to a webcast.
- Timeline Toolbar
- Preview Screen & Notifications
- Cuepoint Mode
- Media Mode
- Trim Mode
- Importing & Exporting Cuepoints
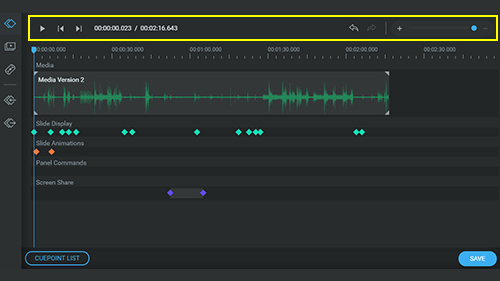
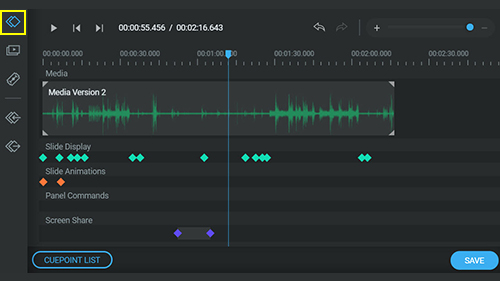
Timeline Toolbar
The Timeline Toolbar appears above the media editor timeline and is consistent across all modes.
- Play/Pause: Preview the webcast edits and changes.
- Next/Previous: Jump to the next or previous cuepoint in the webcast.
- Timecode: The first timecode shows the current location of the cursor while the second timecode shows the total running time of the Media Version.
- Undo: Go one step back in your history of edits, back to the beginning of your session.
- Redo: Go one step forward in your history of edits, until the most recent action in the current session.
- Zoom In/Zoom Out: expand or contract the editor timeline view.

Preview Screen
The preview screen consists of two views, Media and Attendee. You can preview the edits applied to the webcast from these views.
Media ViewMedia View will display only the webcast media (the audio or video shown in the Media Panel).
Attendee ViewAttendee View will display the full webcast console, allowing you to preview the webcast as an attendee.
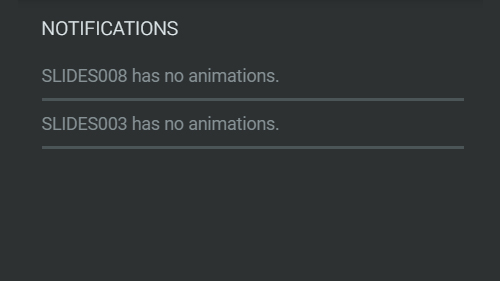
Notifications
Notifications will alert you to any animation and screen share errors that may have occurred during the editing process.
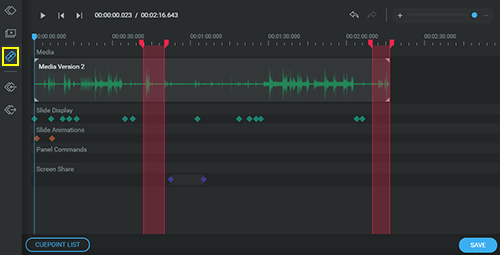
Cuepoint Mode
Cuepoint Mode allows you to batch edit and preview elements associated with cuepoints: Slide Display, Animations, Panel Commands or Screen Share markers. Once edits are final, selecting ‘SAVE’ will apply the edits to the cuepoints in the current Media Version.
Slide DisplayAdd, edit and/or delete slide display times.
AnimationsAdd, edit and/or delete a slide animation
(if a slide animation is present in the PowerPoint deck).
Panel CommandsAdd, edit and/or delete a panel command to highlight and/or feature an active panel in the webcast console.
Screen ShareEdit and/or delete the screen share display time
(only applicable if screen share is a panel, not when using screen share as a source).
Use case scenario: When this webcast ran live, the presenter advanced a slide prematurely. In Cuepoint Mode you can edit the slide display time to correct the timing.
Use case scenario: A pre-recorded webcast features three presenters, each presenter has requested to record their content separately. In the presenter console, each presenter is recorded, resulting in three media versions (version 1, version 2 & version 3). In Media Mode, add a new media version and insert the additional media versions to create one cohesive webcast.
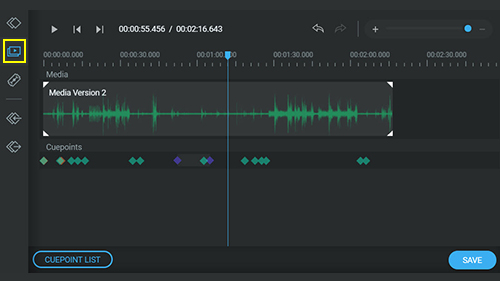
Media Mode
Media Mode allows you to edit the Media Version that is displayed in the Media Panel. Cuepoints are visible in this mode for reference only and will not update based on the applied edits. Once edits are final, selecting ‘SAVE’ will begin the encoding process to create a new Media Version of the webcast.
Replace Video and/or AudioReplace the video content with a black screen (leader) and/or silence the audio for the full Media Version or a specified segment.
SplitSplit allows you to add markers and segment the current Media Version. Replace and Add New commands will use the markers or segments the Split operation added as reference when creating a new Media Version.Add New
Add New will insert new media elements to the current version, either before or after the current segment.
- Blank Media will insert a black screen (leader) and silence.
- Media Version will insert one of the previously created Media Versions of the webcast.
- Uploaded Media will insert an uploaded media file.
Once you have added new media elements to your timeline and previewed them, you must select ‘SAVE’ to create a new Media Version that incorporates your changes.
Trim Mode
Trim Mode allows you to select ranges of media to delete from your recording. Only content in the current Media Version is editable from this mode. Cuepoints are visible in this mode for reference only but will update based on the applied edits. Once all edits have been previewed and are final, selecting ‘SAVE’ will create a new Media Version of the webcast.
Razor IconThe Razor Icon allows you to add markers to select the beginning and end of the segment you want to cut from the Media Version. Once the markers have been added, you can drag them from the top of the timeline to adjust the segment, or click on the red selected segment to refine your selection.
ClearRight-clicking inside the red segment you have selected and clicking Clear will get rid of the segment selection but will not make any changes to the media.
EditRight-clicking inside the red segment you have selected and clicking Edit allows you to refine the selection by editing the timecode. You can also access this mode by clicking inside the red selection.
Use case scenario: This webcast is streaming live from an on-site location and includes a 30 minute break in the middle of the presentation that must be removed before the webcast is archived for on-demand viewing. In Trim Mode, use the Razor to select the time frame of the break and create a new Media Version that removed the break from the final recording.
Import Cuepoints use case scenario: A pre-recorded webcast must be uploaded to Studio and slide timings must be added. Download the Excel template and request slide timings that match the timecode of the webcast media. Upload the media file, PowerPoint slides and Excel cuepoints list using Import Cuepoints. Preview the recording in the Media Editor and select SAVE to create the new Media Version.
Export Cuepoints use case scenario: Two webcasts will broadcast simulive across multiple regions, North America (Webcast A) and Asia Pacific (Webcast B). Webcast A has been recorded and needs to be repurposed for Webcast B. In Webcast A, export the cuepoints. In Webcast B, import the cuepoints and add the media version from Webcast A in Media Mode.
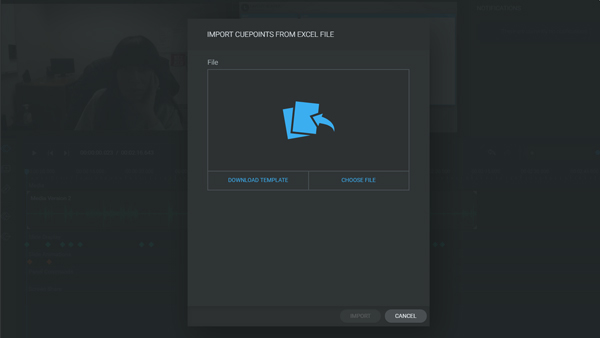
Importing Cuepoints
This feature allows you to import cuepoints from an Excel file by either uploading it using the CHOOSE FILE option or dropping it in the import window directly from your Finder/File Explorer window. You can also download a template Excel file to fill out before importing cuepoints. Only Slide Display and Slide Animation cuepoints are imported. Screen share or panel command cuepoints must be entered manually.
Download TemplateDownload an excel template and insert the applicable Slide Display and Slide Animation timings.
Choose FileChoose the downloaded template containing the applicable Slide Display and Slide Animation timings and upload.
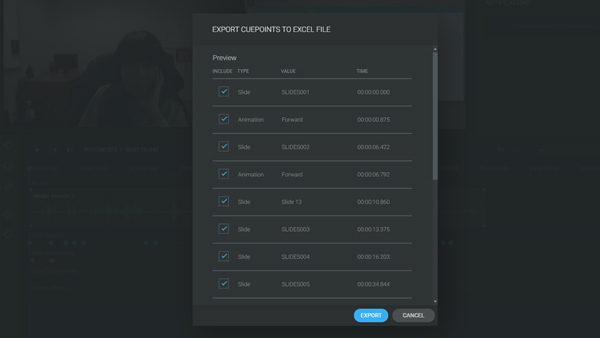
Exporting Cuepoints
This feature allows you to select cuepoints to export to an Excel file. Only Slide Display and Slide Animation cuepoints are exported.
ExportExport webcast cuepoints.